

An easel card is one of those delightful designs that feels special the moment it’s opened. Instead of lying flat like a traditional card, it’s built to stand upright — just like a tiny tabletop easel. That means the recipient can display it on a mantel, shelf, or desk and enjoy it long after the celebration. This makes easel cards perfect for weddings, birthdays, milestone moments, or anytime you want your handmade card to become part of someone’s space.
Today I’m sharing an alternate project using the June 2026 Paper Pumpkin kit: Bikes & Blooms. During my live class, I’ll walk you through the full assembly, but I wanted to give you the measurements, supplies, and design notes here so you can recreate it easily — or adapt it using your own stash.
🌼 Bikes & Blooms Easel Card
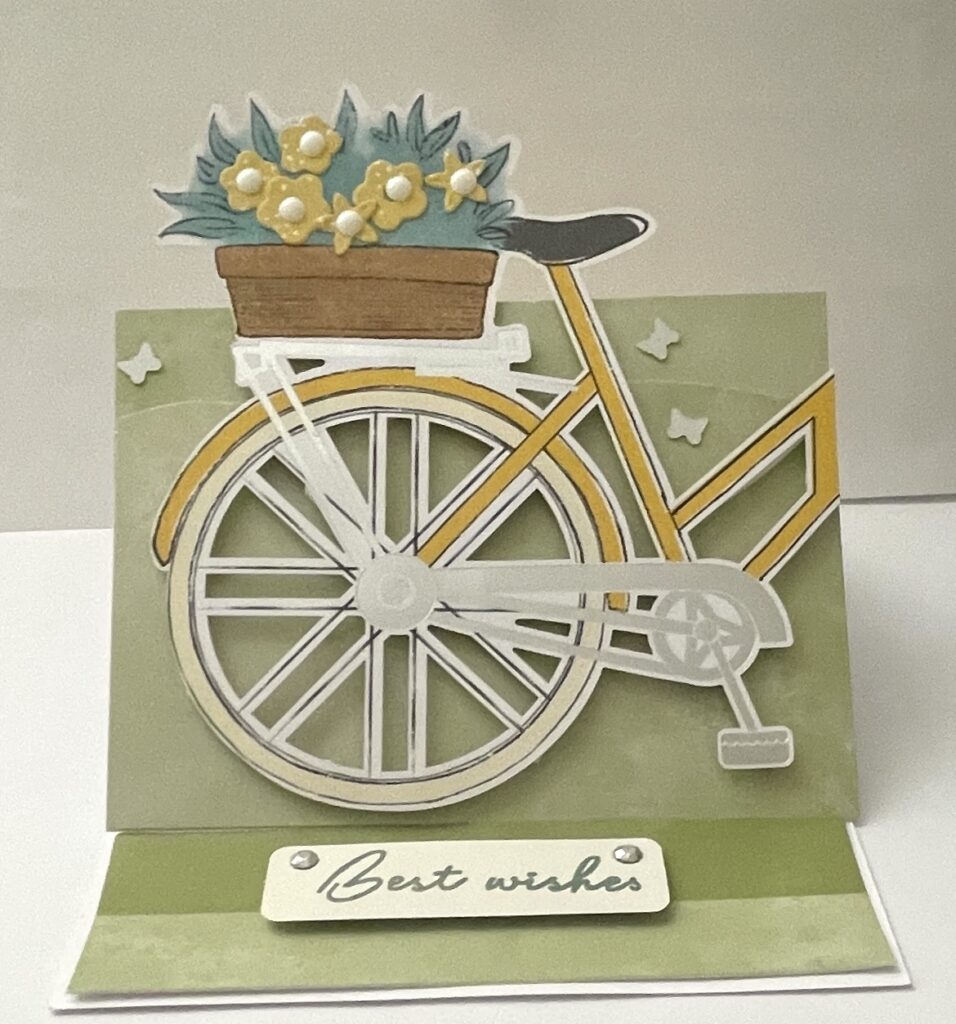
This alternate card uses the bicycle elements from the kit along with a few simple cuts to create a clean, cheerful easel-style display. The layered greens and yellows give the card a fresh summer feel, and the “Best Wishes” sentiment makes it versatile for many occasions.
✂️ Measurements & Supplies
- Easel Card Base — Basic White cardstock measuing 4-1/4″ x 11″ scored at 2-3/4″ and 5-1/2″ s to create the easel fold
- Yellow panel
- Full panel: 4‑⅛” x 5‑¼”
- Half panel option: 2‑¾” x 5‑¼”, trimmed to 2‑⅝” x 5‑¼”
- Green panels
- Main green: 2‑¾” x 4‑⅛”
- Accent green strip: 1‑¼” x 4‑⅛”
- Sentiment strip
- Use the small Basic White strip included in the kit
- Stamp choice
- “Best Wishes” stamp from the Bikes & Blooms kit
- Bicycle element
- Use the bicycle half die-cut from the kit
- Floral accents
- Small die-cut flowers from the kit or stamp flowers directly onto the green flower‑pot area behind the bicycle
🌟 Assembly Notes
- The easel mechanism works by creating a “stopper” inside the card — your sentiment strip is perfect for this.
- Layering the two green pieces adds depth and gives the bicycle a natural “scene” to sit in.
- If you want more dimension, pop the bicycle up on foam dots and tuck stamped or die-cut flowers behind the basket.
- The yellow panel can be full or half-sized depending on how much color you want showing behind the easel front.
- This design works beautifully with the kit colors, but it’s also stash-friendly — swap in any coordinating DSP or cardstock you already have.