


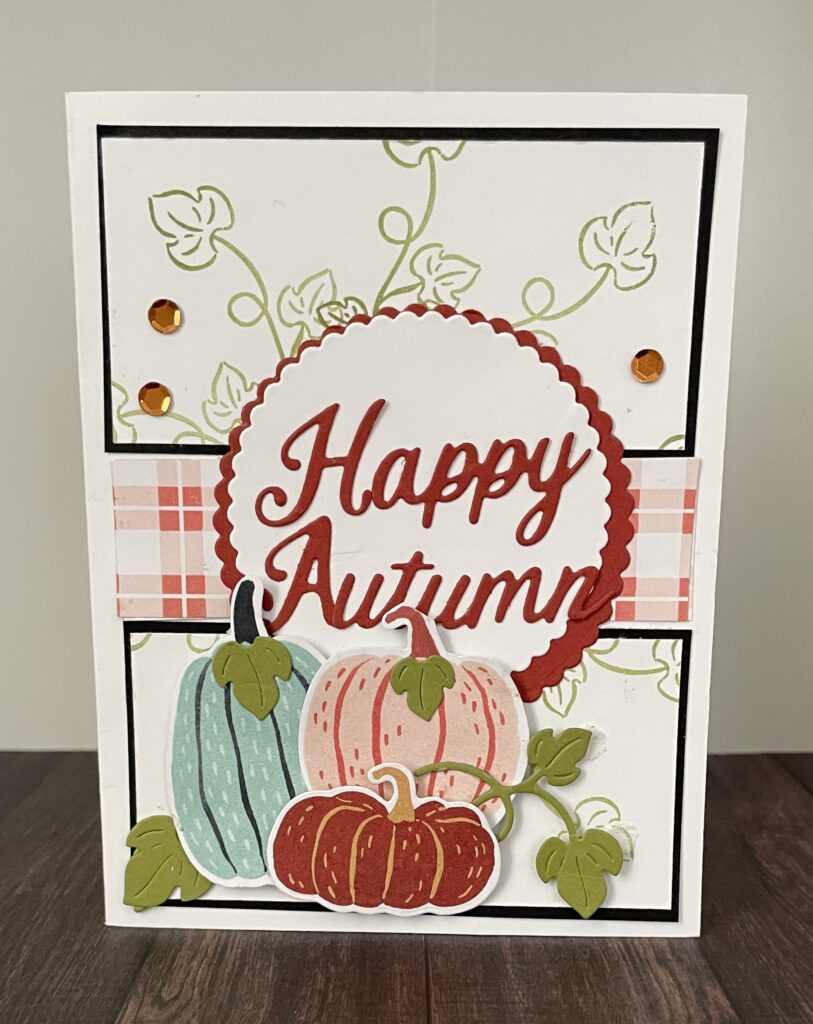
Today I just wanted to play with the Painted Patch Designer Series Paper and thought I’d share the card that came out of my experimenting. I had already used the Painted Pumpkins dies to cut some pumpkins from the DSP, and I wanted to give them a home on a card. At the same time, I revisited a favorite technique for building a wreath.
Building the Wreath Base
To start, I cut two squares of cardstock from my stash, each measuring 3‑¾” x 3‑¾”. I adhered them together so the corners overlapped, creating a star‑like shape with eight points. This shape becomes the guide for stamping a wreath.
Using my old stamp positioner (a MISTI works perfectly too), I temporarily taped the star shape inside the tool. Then I cut another 3‑¾” x 3‑¾” square from Basic White cardstock. For the wreath, I chose a vine stamp from the Painted Pumpkins stamp set and inked it up with Mossy Meadow. With the cardstock taped in place, I stamped the vine on one corner, lifted the lid, rotated the square to the next point, and repeated. After rotating through all eight corners, I had a lovely wreath image.
Assembling the Card
Next, I cut the stamped square in half (1‑⅞” each). Each half was matted on Basic Black cardstock cut to 2” x 3‑⅞”. I adhered one panel at the top of a top‑folding A2 card base and the other at the bottom, leaving equal margins around them. Between the two panels, I added a 1” x 4” strip of the Painted Patch DSP.
For the focal point, I layered circles cut with the Spotlight on Nature dies: a 2‑¾” circle of DSP topped with a 2‑½” circle of Basic White. This became the perfect spot for my sentiment.
Finishing Touches
To embellish, I tucked in the pumpkins I had cut earlier from the DSP, arranging them at the bottom of the circle and card base. A few adhesive‑backed sequins from my stash added just the right sparkle.
✨ This project was such a fun way to combine a wreath‑building technique with the Painted Patch DSP. It’s stash‑friendly, playful, and gives those pumpkin die‑cuts a chance to shine.
✂️ Tutorial Recap
- Cut cardstock squares – Two 3‑¾” x 3‑¾” squares, adhered offset to form a star shape.
- Stamp wreath – Use a vine stamp in Mossy Meadow ink, rotating the Basic White square through all eight points.
- Trim and mat panels – Cut the wreath square in half (1‑⅞”), mat each on Black cardstock (2” x 3‑⅞”).
- Assemble card base – Adhere one panel at the top and one at the bottom of an A2 card base.
- Add DSP strip – Place a 1” x 4” strip of Painted Patch DSP between the panels.
- Layer circles – Cut a 2‑¾” DSP circle and a 2‑½” Basic White circle; layer for sentiment.
- Embellish with pumpkins – Add die‑cut pumpkins and adhesive‑backed sequins for finishing touches.
🧰 Supply List
- Painted Patch DSP
- Painted Pumpkins dies
- Painted Pumpkins stamp set (vine image)
- Spotlight on Nature dies (circle cuts)
- Basic White cardstock
- Basic Black cardstock
- Mossy Meadow ink
- Stamp positioner (MISTI or similar)
- Adhesive‑backed sequins
- A2 card base