Waiting For Spring – Featuring Lovely & Beautiful DSP
I am hoping Spring will start to peek through here in the studio, so today I’m sharing a bright, cheerful scrapbook layout inspired by a PageMaps sketch. I loved the clean lines of the sketch and knew immediately that I wanted to pair it with the Lovely & Beautiful Designer Series Paper. The soft florals and fresh color palette were the perfect match for a spring-themed page.
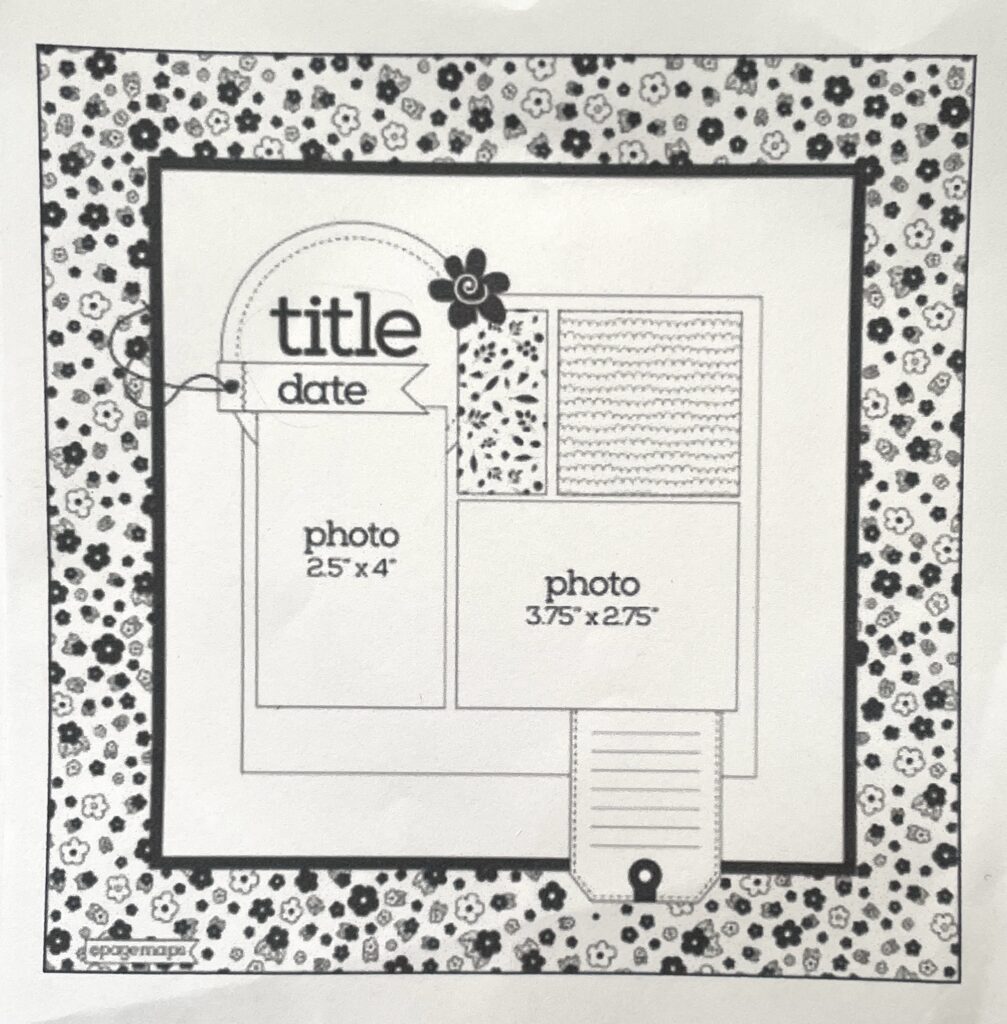
For this layout, I adapted the original sketch to a 12″ x 12″ format, keeping the overall structure but giving myself more room to play with patterned paper and embellishments. The result is a layout that feels airy, floral, and full of seasonal charm.
🌸 Featured Elements
Lovely & Beautiful DSP
This paper truly shines on this page. I used one of the floral patterns as the full background and layered coordinating prints behind the photo mats. The mix of soft purples, greens, and peach tones creates a gentle spring mood without overwhelming the photos.
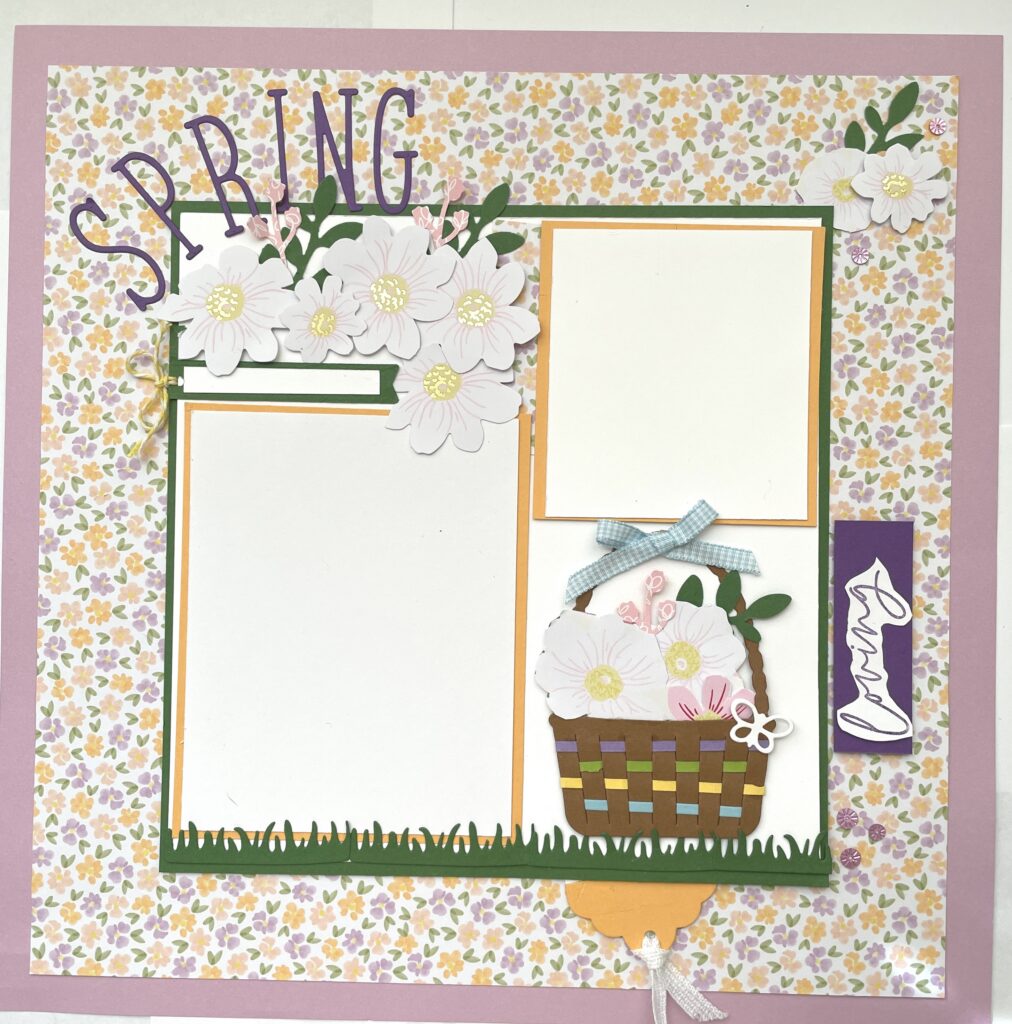
Woven Basket from the Easter Joy Dies
The basket might be my favorite part of the entire layout. I die-cut the woven basket and filled it with floral ephemera from the January 2026 Paper Pumpkin kit. The textures and layers make it feel dimensional and sweet—like a little spring bouquet tucked into the corner of the page.
To finish it off, I tied a blue gingham ribbon around the basket. That tiny detail adds such a charming pop and ties the whole color story together.
PageMaps Sketch Inspiration
Sketches are one of my favorite ways to jumpstart creativity. This one gave me a great foundation with two photo spots, a title area, and room for embellishments. I followed the general layout but expanded the proportions to fit a full 12″ x 12″ page.
🪻 Supplies Used
- Lovely & Beautiful DSP
- Fresh Freesia cardstock
- Easter Joy Dies (woven basket)
- January 2026 Paper Pumpkin ephemera
- Blue gingham ribbon
- Currently Loving Stamp set
- Gorgeous Grape cardstock strip
- Garden Green cardstock
- Peach Pie cardstock
- Pecan Pie cardstock for basket
- Basic White cardstock
- White ribbon
- Gorgeous Grape ink
- PageMaps sketch
🌿 How to Recreate This Layout
- Start with a 12″ x 12″ sheet of Fresh Freesia two tone cardstock as your background.
- Layer an 11″ x 11″ piece Lovely & Beautiful DSP on top.
- In the middle of the DSP adhere an 8″ x 8″ piece of Garden Green cardstock
- On top of that Garden Green add an 7-3/4″ x 7-3/4″ piece of Basic White cardstock
- Cut 1 a photo mat out of Peach Pie cardstock that measures 4-1/8″ x 5-1/4″.
- Add a Basic White photo placer that measures 4″ x 5″ Then you can add your photos sized to match the Basic White mat (or adjust to your photos).
- Cut another Peach Pie layer measuring 3-1/4″ x 3-3/4″
- Cut a 3″ x 3-1/2″ Basic White layer to go on top of the Peach Pie layer
- Use the Easter Joy dies to cut grass out of Garden Green cardstock.
- Create the woven basket using the Easter Joy dies and fill it with floral ephemera.
- Add a ribbon bow to the basket for extra charm.
- Arrange your title, journaling strip, and embellishments following the sketch.
- Use the Al a Mode Alphabet dies to create your title.
- Use the Currently Loving stamp set for a word.
- Finish with a few flowers and leaves to bring the page to life.
🌼 Final Thoughts
This layout was such a joy to create, and I love how the DSP and basket work together to celebrate the season. If you give this sketch a try, I’d love to see your version! Share it with me by tagging me. #EasterlayoutsWithRPM